ClassMATE User Guide
Introduction
Are you having trouble with administrative work as a CS2101 tutor? Do current tools like Excel sheets or the pen and paper cause a lot of pain when trying to organize and search for students or recording class participation? Could there be a way to streamline this process while providing you a better way to visualise the information? Well, ClassMATE has it all covered!
ClassMATE is a desktop app designed for you to manage student contacts and organize them into their tutorial classes and groups neatly, as well as recording of students’ class participation without much hassle. Having both a Command Line Interface (CLI) and a Graphical User Interface (GUI), it saves you time on your CS2101 administrative work while providing a pleasant experience at the same time.
This user guide for ClassMATE will teach you how to:
- Create students, classes and groups
- Organize groups in their respective classes
- Add students to a class and their respective oral presentation groups within the class
- Filter and search students by groups and classes
- Add class participation marks for students
Check out the first few sections on how to set up ClassMATE and an overview of the symbols and syntax we use in the user guide. You can go through the remaining sections to learn how to use the various efficient features of ClassMATE, comprising the Tutorial Class, Student, Student Marks, and Tutorial Group Commands.
Use the Table of Contents below to navigate to relevant sections to learn the commands for ClassMATE.
Click on a section title to head there now!
- Introduction
- How to use this User Guide
- Quick Start
- CLI Tutorial
- Features
- Tutorial Class Commands
- Student Commands
- Student Marks Commands
- Tutorial Group Commands
- Other Features
- FAQ
- Command Summary
- Contact Us
- Glossary
How to use this User Guide
This User Guide helps you familiarize yourself with ClassMATE, its features, commands and uses!
- Use the Quick Start below
 to set up ClassMATE on your Computer.
 - You may view the entire list of ClassMATE’s Features by clicking here.
- Alternatively, you can refer to the Command Summary Table at the bottom, or by clicking here.
- You can check out a list of frequently-asked questions (FAQs) here and the glossary here
Throughout the User Guide,
![]() Notes will be used to give additional points regarding features
Notes will be used to give additional points regarding features
![]() Tips will be used to provide quick information bits about features
Tips will be used to provide quick information bits about features
![]() Warning will be used to provide warnings about features
Warning will be used to provide warnings about features
We hope you find this User Guide helpful when using ClassMATE!
Quick Start
- Ensure you have Java
11or above installed in your Computer. (Go to this website and follow the instructions to download and install Oracle JDK 11, which is basically Java 11.) -
Download the latest
classmate.jarfrom here. -
Copy the file to the folder you want to use as the home folder for your ClassMATE.
 Note: Remember which folder is your home folder, as it might be required if you need to make any manual changes!
 -
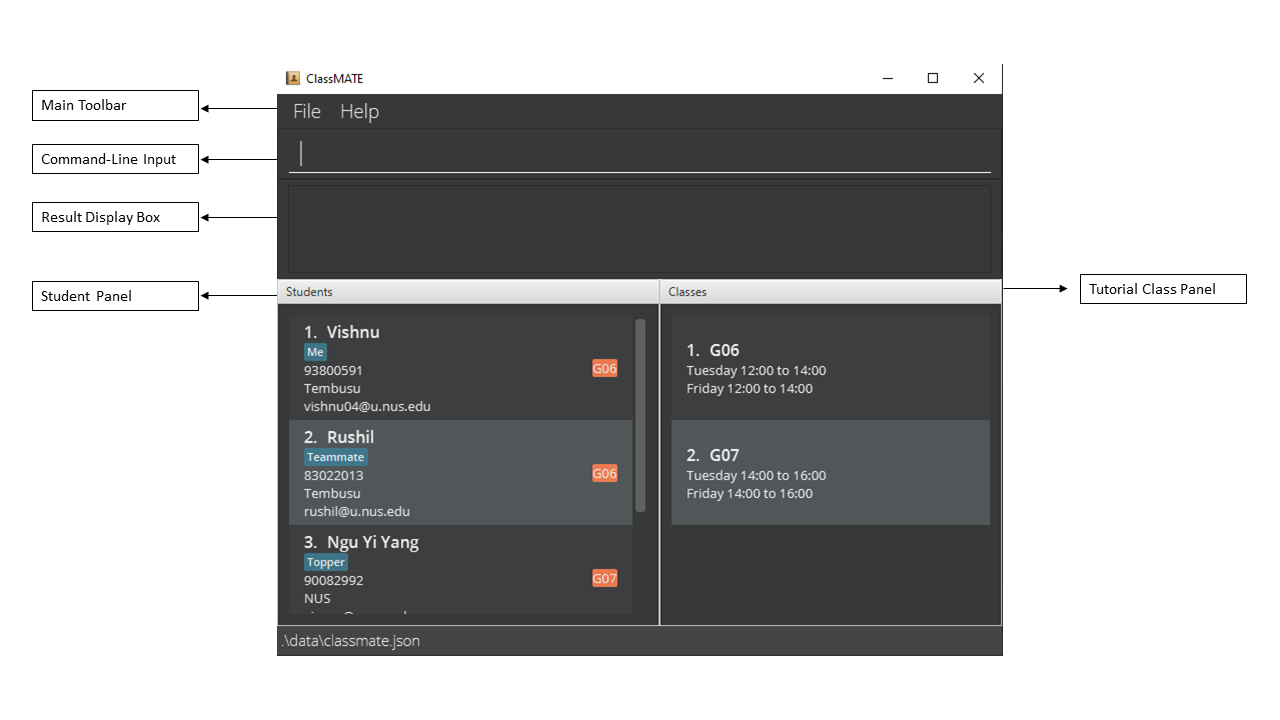
Double-click the file to start the app. The GUI similar to the below should appear in a few seconds. Note how the app contains some sample data (Not necessarily the same data).
-
Type the command in the Command-Line Input and press Enter to execute it. e.g. typing
helpand pressing Enter will open the help window. Check out some examples in the Tutorial - Refer to the Features below for details of each command.
CLI Tutorial
In this section, you will familiarize yourself with the use of CLI to facilitate your experience when using ClassMATE. All commands have to be typed in the Command-Line Input located at the top of the user interface as shown in the image below.
Once you have familiarised yourself with the layout of the application, try out some example commands!
Some example commands you can try:
-
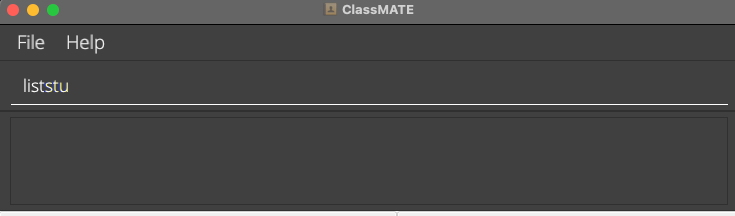
liststu: Lists all students. All students currently stored in ClassMATE will be displayed in the Student Panel. -
addc c/G06 s/Tuesday 2:00pm to 4:00pm, Friday 2:00pm to 4:00pm: Adds a tutorial class with the codeG06.The Tutorial Class Panel should reflect the updated list of tutorial classes including your new class,
G06. -
addstu n/John Doe p/98765432 e/johnd@example.com a/John street, block 123, #01-01 c/G06: Adds a student namedJohn Doeto ClassMATE.The Student Panel Should reflect the updated list of students including your new student,
John Doe. -
deletestu 3: Deletes the 3rd student shown in the current list. -
clear: Deletes all data from ClassMATE. -
exit: Exits the app.
Once you have attempted these commands, you’re ready to go!
Command Format
![]() Notes about the command format:
Notes about the command format:
These are general rules applying to all explanations and command formats listed below!
-
Words in
UPPER_CASEare the parameters to be supplied by the user.
e.g. inaddstu n/NAME,NAMEis a parameter which can be used asadd n/John Doe. -
Items in square brackets are optional.
e.g.n/NAME [t/TAG]can be used asn/John Doe t/friendor asn/John Doe. -
Items with
… after them can be used multiple times including zero times.
e.g.[t/TAG]…can be used ast/friend,t/friend t/familyetc. -
You can add parameters in any order.
e.g. if the command specifiesn/NAME p/PHONE_NUMBER, you can also typep/PHONE_NUMBER n/NAMEfor the parameters. -
If a parameter is expected only once in the command, but you specified it multiple times, only the last occurrence of the parameter will be taken.
e.g. if you specifyp/12341234 p/56785678, onlyp/56785678will be taken. -
If you add parameters for commands that do not take in parameters (such as
help,liststu,exitandclear), they will be ignored.
e.g. if the command specifieshelp 123, it will be interpreted ashelp. -
INDEXitems must be positive integers. Negative integers, decimal values, and zero will not be accepted for any commandINDEX.e.g. if the command
viewstu -5is entered, it will throw an invalid command format error, telling you to enter a positive integerINDEXonly!
Features
Here, you can find instructions on how to use ClassMATE’s various features. The features are divided into five main subsections, each covering different groups of commands:
- Tutorial Class Commands
- Student Commands
- Student Marks Commands
- Tutorial Group Commands
- Other Commands
Each subsection will provide you with an overview, followed by the individual command formats, instructions on how to use them, examples of their usage and the expected outcome of executing these commands.
Tutorial Class Commands
This section covers all the commands you can use to manage information pertaining to tutorial classes!
Features include the ability to:
- Add a tutorial class
- List all tutorial classes
- View all students in a tutorial class
- Find a tutorial class by its class code
- Delete a tutorial class
Adding a tutorial class : addc
Adds a tutorial class to ClassMATE.
Entering format: addc c/CLASS_CODE s/SCHEDULE [t/TAG]…
![]() Note:
Note:
-
Class Code should consist of ‘G’ followed by two numerical digits (i.e. any value from ‘G01’ to ‘G99’).
-
Schedule consists of only 2 weekly timeslots. Each time slot should be written in the format
Day H:MM am/pm to H:MM am/pm(e.g.Wed 12:00pm to 2:00pm) -
The
Dayshould be start with a capital letter. Short form for days are also accepted (e.g. Tues for Tuesday).
Examples:
addc c/G06 s/Tuesday 2:00pm to 4:00pm, Friday 2:00 to 4:00pmaddc c/G01 s/Monday 10:00am to 12:00pm, Thursday 10:00am to 12:00pm
Listing all classes : listc
Shows a list of all classes in ClassMATE.
Entering format: listc
Viewing a class: viewc
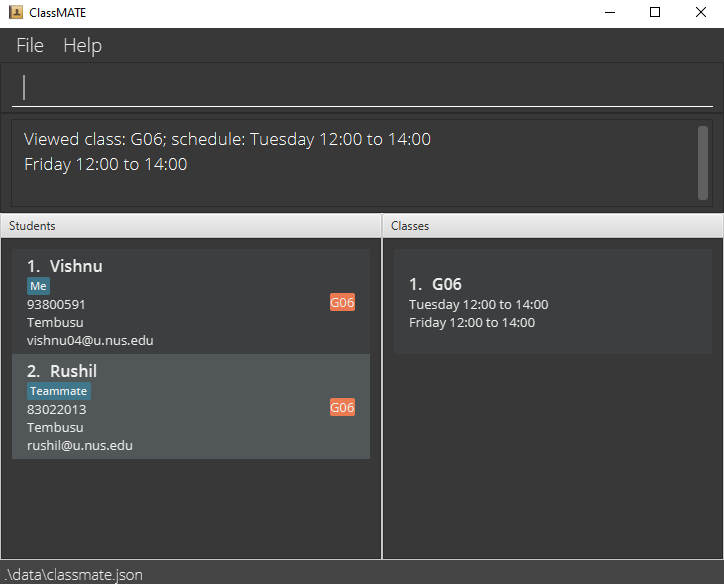
Displays a class and its students in ClassMATE, as shown above.
viewc highlights the class at the given INDEX, and filters out only students in that class!
Entering format: viewc INDEX
- Views the class details at the specified INDEX.
- Details of a class includes students in the class and the class schedule.
- The index refers to the index number shown in the displayed list of classes, not the Class Code.
![]() Note:
Note:
- The index must be a positive integer 1, 2, 3, …
findc command to find a particular class before viewing it.
Examples:
-
listcfollowed byviewc 2shows the 2nd class in the displayed class list.
Finding classes by class codes: findc
Finds a class by its class code.
Entering format: findc CLASS_CODE [MORE_CLASS_CODES]
![]() Note:
Note:
- The search is absolute. e.g.
G0will not matchG06
Examples:
-
findc G02returnsG02if it exists.
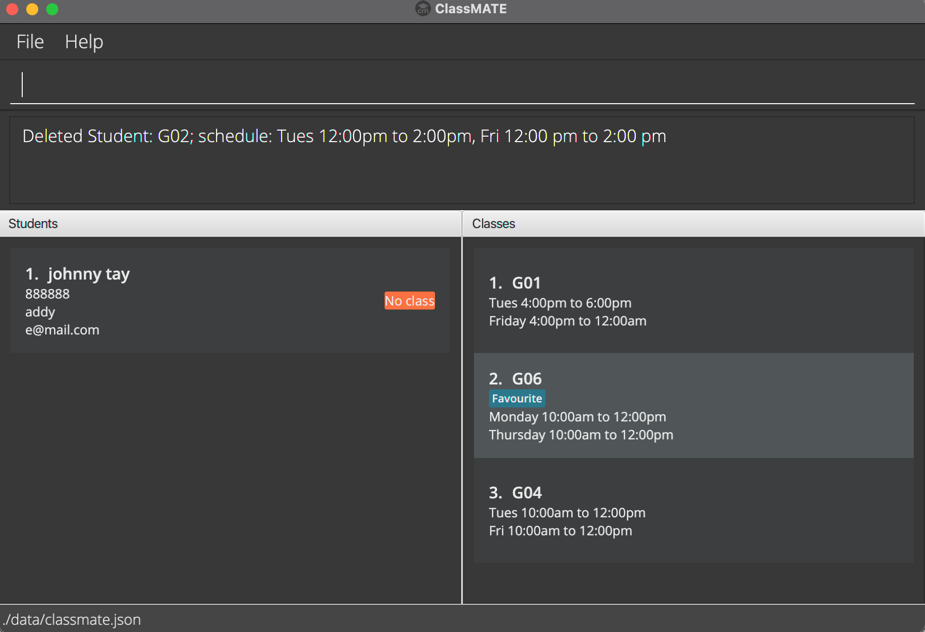
Deleting a class: deletec
Deletes a class from ClassMATE.
Entering format: deletec INDEX
- Deletes the class at the specified INDEX.
- The index refers to the index number shown in the displayed list of classes.
![]() Note:
Note:
- The index must be a positive integer 1, 2, 3, …
- Students formerly belonging to the deleted class would now be assigned to
No Class. Groups that students were assigned to in the class will no longer exist and students will have no groups.
Examples:
-
listcfollowed bydeletec 2deletes the 2nd class in the list of classes. -
findc G06followed bydeletec 1deletes the 1st class in the results of thefindccommand.
Student Commands
This part of the guide covers all the commands you can use to manage student information!
You can:
- Add a new student
- Edit an existing student
- View a student’s details
- List all students
- Find students by name
- Delete a student
Adding a student: addstu
Adds a student to ClassMATE.
Entering format: addstu n/NAME p/PHONE_NUMBER e/EMAIL a/ADDRESS c/CLASS_CODE [t/TAG]…
- The Name of a student accommodates special characters such as hyphens, apostrophes and slashes.
- A student can have any number of tags (including 0)
![]() Note:
Note:
- The phone number should be at least 3 digits long.
- The tutorial class with the given Class Code must already exist in classmate.
Examples:
- If class G06 has not been created, add the class first using
addc. addstu n/John Doe p/98765432 e/johnd@example.com a/John street, block 123, #01-01 c/G06addstu n/Betsy Crowe t/proactive e/betsycrowe@example.com a/10 Kent Dr, #02-02 p/1234567 c/G06 t/teamPlayer
Editing a student : editstu
Edits an existing student in ClassMATE.
Entering format: editstu INDEX [n/NAME] [p/PHONE_NUMBER] [e/EMAIL] [a/ADDRESS] [c/CLASS_CODE] [t/TAG]…
-
Edits the student at the specified
INDEX. The index refers to the index number shown in the displayed student list. The index must be a positive integer 1, 2, 3, … Note: -
At least one of the optional fields must be provided.
 Warning:
An error message will be displayed to provide at least one parameter if no parameters are provided, regardless of whether the INDEX is valid or not. The INDEX will be checked after at least one optional parameter is provided.
Warning:
An error message will be displayed to provide at least one parameter if no parameters are provided, regardless of whether the INDEX is valid or not. The INDEX will be checked after at least one optional parameter is provided.
-
The index must be a positive integer 1, 2, 3, …
-
Existing values will be updated to the input values.
-
When editing tags, the existing tags of the student will be removed i.e. adding of tags is not cumulative.
-
You can remove all the student’s tags by typing
t/without specifying any tags after it.
Examples:
-
editstu 1 p/91234567 e/johndoe@example.comEdits the phone number and email address of the 1st student to be91234567andjohndoe@example.comrespectively. -
editstu 2 n/Betsy Crower t/Edits the name of the 2nd student to beBetsy Crowerand clears all existing tags.
Viewing a student : viewstu
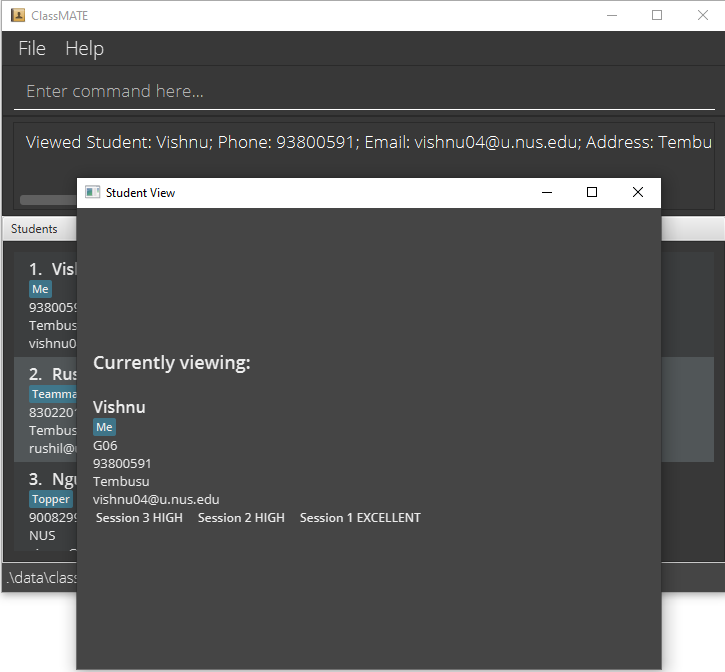
Views a student’s details in ClassMATE, as shown in the picture above.
Format: viewstu INDEX
- Views the student’s details at specified
INDEX - The index refers to the index number shown in the displayed student list.
![]() Note:
Note:
- The index must be a positive integer 1, 2, 3, …
-
viewstuis the only way to view a student’s marks!
Examples:
-
liststufollowed byviewstu 2shows second student in the student list. -
findstu Betsyfollowed byviewstu 1shows the 1st student in the results of the find command.
Listing all students : liststu
Shows a list of all students in ClassMATE.
Entering format: liststu
- All students stored are listed.
Finding students by name: findstu
Finds students whose names contain any of the given keywords.
Entering format: findstu KEYWORD [MORE_KEYWORDS]
- The search is case-insensitive. e.g.
hanswill matchHans - Only the name is searched.
- Only full words will be matched e.g.
Hanwill not matchHans
Examples:
-
findstu JohnreturnsjohnandJohn Doe -
findstu alex davidreturnsAlex Yeoh,David Li
Deleting a student : deletestu
Deletes the specified student from the student list.
Entering format: deletestu INDEX
- Deletes the student at the specified
INDEX. - The index refers to the index number shown in the displayed student list.
![]() Note:
Note:
- The index must be a positive integer 1, 2, 3, …
Examples:
-
liststufollowed bydeletestu 2deletes the 2nd student in the student list. -
findstu Betsyfollowed bydeletestu 1deletes the 1st student in the results of thefindstucommand.
Student Marks Commands
This section of the guide covers all the commands you can use to manage student marks!
You can:
There are 6 types of Marks that can be assigned to a student for each session that the student attends. These marks are meant to be a class participation score, but you can use it flexibly. The marks that can be assigned are:
- Poor
- Low
- Avg (short for Average)
- Good
- High
- Excellent
Adding the Latest Mark: addlm
Adds a mark to a student for their latest session.
Entering format: addlm INDEX m/MARK
- Mark is not case-sensitive.
- The index refers to the index number shown in the displayed student list.
![]() Note:
Note:
- The index must be a positive integer 1, 2, 3, …
Examples:
-
liststufollowed byaddlm 2 m/Lowassigns LOW mark to the latest session for 2nd student in the student list. -
findstu Betsyfollowed byaddlm 1 m/excellentassigns EXCELLENT mark to the latest session for 1st student in the results offindstu.
Deleting Latest Mark: deletelm
Deletes the mark of a student for their latest session.
Entering format: deletelm INDEX
- Deletes mark as the mark for latest session.
- Student has to have some marks assigned previously.
- The index refers to the index number shown in the displayed student list.
![]() Note:
Note:
- The index must be a positive integer 1, 2, 3, …
Examples:
-
liststufollowed byaddlm 2 m/Lowanddeletelm 2deletes the LOW mark assigned to the 2nd student in the student list. -
findstu Betsyfollowed bydeletelm 1deletes the latest sessions’ mark for 1st student in the results offindstu.
Deleting All Marks: deleteam
Deletes all marks for a student.
Entering format: deleteam INDEX
- Student has to have some marks assigned previously.
- The index refers to the index number shown in the displayed student list.
![]() Note:
Note:
- The index must be a positive integer 1, 2, 3, …
Examples:
-
liststufollowed byaddlm 2 m/Lowanddeleteam 2deletes all marks assigned to the 2nd student in the student list. -
findstu Betsyfollowed bydeleteam 1deletes all sessions’ mark for 1st student in the results offindstu.
Tutorial Group Commands
These are the commands that involve tutorial groups!
The first part covers interactions between groups and classes, while the second part covers interactions between students and groups.
You can:
- Add a new tutorial group
- Views all students in a tutorial group
- Delete a tutorial group
- Add a student to a tutorial group
- Delete a student from a tutorial group
Adding a Tutorial Group: addcg
Adds a tutorial group to a particular tutorial class in ClassMATE.
Entering format: addcg gn/GROUP_NUMBER c/CLASS_CODE type/GROUP_TYPE
![]() Note:
Note:
- GROUP_NUMBER should be a single digit
- GROUP_TYPE refers to the assignment that the group will work for. It should only be OP1 or OP2.
- The class must have already been added to ClassMATE first. If you are unsure, you can refer to Adding a Tutorial Class
- Tutorial groups are identified by GROUP_NUMBER, GROUP_TYPE and CLASS_CODE. This means that any two tutorial groups are identical if all three fields are identical, which is not allowed.
Examples:
-
addcg gn/1 c/G01 type/OP1adds Group 1 to classG01assigned to the taskOP1
Viewing a Tutorial Group: viewg
Displays all students in a particular tutorial group in ClassMATE.
Entering format: viewg c/CLASS_CODE type/GROUP_TYPE gn/GROUP_NUMBER
![]() Note:
Note:
- Only
OP1andOP2are accepted as Group Types.
Examples:
-
viewg c/G06 type/OP2 gn/1lists the students inOP2Group1of classG06
Deleting a Tutorial Group: deletecg
Deletes a tutorial group from ClassMATE.
Entering Format: deletecg c/CLASS_CODE type/GROUP_TYPE gn/GROUP_NUMBER
![]() Note:
Note:
-
GROUP_NUMBER should be a single digit
-
GROUP_TYPE refers to the assignment that the group will work for. It should only be OP1 or OP2.
-
All students in the deleted group will no longer be in the group.
Examples:
-
deletecg c/G06 type/OP2 gn/1deletes theOP2Group1of classG06
Adding Students to a Tutorial group: addsg
Adds a student to a tutorial group.
Entering format: addsg INDEX gn/GROUP_NUMBER c/CLASS_CODE type/TYPE
- Adds the student to a group in the class
![]() Note:
Note:
- Only
OP1andOP2are accepted as Group Types. - A student can only be added to a group if the group has been created under the same class already!
Example:
-
addsg 1 gn/1 c/G06 type/OP1adds the student at index 1 to OP1 Group 1 in class G06
Deleting Student from a group: deletesg
Deletes a student from a group.
Entering format: deletesg INDEX g/GROUP_NUMBER c/CLASS_CODE type/TYPE
- Deletes the student from a group in the class
- Type refers to the assignment that the group will work together for
![]() Note:
Note:
- Only
OP1andOP2are accepted as Group Types.
Example:
-
liststu c/G06shows that Betsy is a student in class G06 with Index 1.deletesg 1 gn/1 c/G06 type/OP1then removes Betsy from OP1 Group 1 in class G06
Other Features
These are other commands and features you can use in ClassMATE!
Viewing help : help
Shows a message explaining how to access the help page, which directs you to this user guide. So, don’t worry about forgetting commands, just refer to this guide!

Entering format: help
Clearing all data : clear
Clears all data from ClassMATE. Below is how it would look like.
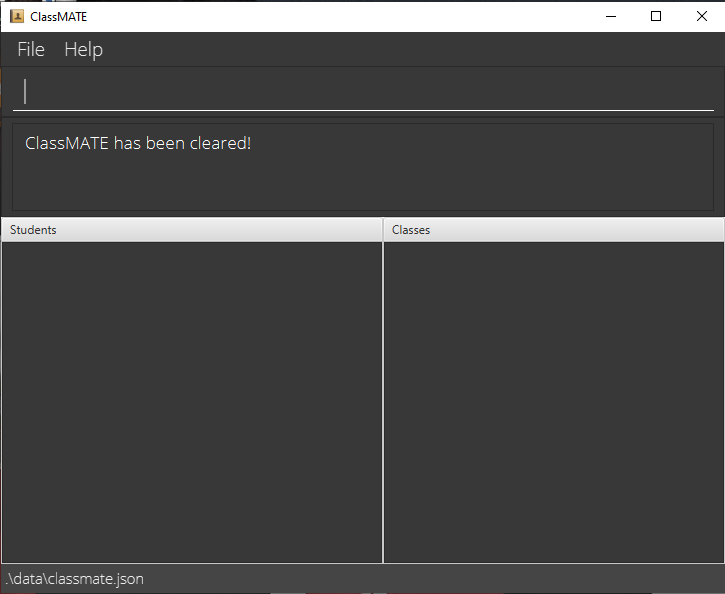
Entering format: clear
Exiting the program : exit
Exits the program.
Entering format: exit
Saving the data
Saving ClassMATE data is a hassle-free process. Data is saved in the hard disk automatically after any command that changes the data. There is no need to save manually.
Editing the data file
In order to find a specific class, use the findc command to find a particular class before viewing it.
ClassMATE data are saved as a JSON file [Home Folder/JAR File Location]/data/classmate.json.
Advanced users are welcome to update data directly by editing that data file.
FAQ
Q: How do I transfer my data to another Computer?
A: Install the app in the other computer and overwrite the empty data file it creates with the JSON file that contains the data of your previous ClassMATE home folder.
Q: Can I create tutorial groups that are not for Oral Presentation 1 or 2?
A: No, currently ClassMATE only supports the creation of Tutorial Groups for Oral Presentations 1 and 2 only.
Q: Can I view students only belonging to a certain Tutorial Class alone?
A: Yes, use the viewc command to do so. The viewc command is explained here
Command Summary
Tutorial Class Commands
| Action | Format, Examples |
|---|---|
| Add class |
addc c/CLASS_CODE s/SCHEDULE [t/TAG]…e.g., addc c/G06 s/Tuesday 2:00pm to 4:00pm, Friday 2:00pm to 4:00pm
|
| List all classes | listc |
| View students in class |
viewc INDEXe.g., listc followed by viewc 3
|
| Find class |
findc CLASS_CODE [MORE_CLASS_CODES]e.g., findc G02
|
| Delete class |
deletec INDEXe.g., listc followed by deletec 2
|
Student Commands
| Action | Format, Examples |
|---|---|
| Add student |
addstu n/NAME p/PHONE_NUMBER e/EMAIL a/ADDRESS c/CLASS_CODE [t/TAG]…e.g., addstu n/James Ho p/22224444 e/jamesho@example.com a/123, Clementi Rd, 1234665 c/G01 t/attentive
|
| Edit student |
editstu INDEX [n/NAME] [p/PHONE_NUMBER] [e/EMAIL] [a/ADDRESS] [c/CLASS_CODE] [t/TAG]…e.g., editstu 2 n/James Lee e/jameslee@example.com
|
| List students |
liststue.g., liststu
|
| View student |
viewstu INDEXe.g., liststu followed by viewstu 2
|
| Find student |
findstu KEYWORD [MORE_KEYWORDS]e.g., findstu John
|
| Delete student |
deletestu INDEXe.g., liststu followed by deletestu 3
|
Student Marks
| Action | Format, Examples |
|---|---|
| Add latest mark |
addlm INDEX m/MARKe.g., liststu followed by addlm 1 m/excellent
|
| Delete latest mark |
deletelm INDEXe.g., liststu followed by deletelm 2
|
| Delete all marks |
deleteam INDEXe.g., liststu followed by deleteam 3
|
Tutorial Groups
| Action | Format, Examples |
|---|---|
| Add tutorial group |
addcg gn/GROUP_NUMBER c/CLASS_CODE type/TYPE e.g., addcg gn/1 c/G11 type/OP1
|
| View students from group |
viewg gn/GROUP_NUMBER c/CLASS_CODE type/GROUP_TYPE e.g., viewg gn/1 c/G01 type/OP1
|
| Delete tutorial group |
deletecg gn/GROUP_NUMBER c/CLASS_CODE type/GROUP_TYPE e.g., deletecg gn/1 c/G01 type/OP1
|
| Add student to group |
addsg INDEX gn/GROUP_NUMBER c/CLASS_CODE type/GROUP_TYPE e.g., addsg 1 gn/1 c/G01 type/OP1
|
| Delete student from group |
deletesg INDEX gn/GROUP_NUMBER c/CLASS_CODE type/GROUP_TYPE e.g., deletesg 1 gn/1 c/G01 type/OP1
|
Other Commands
| Action | Format, Examples |
|---|---|
| Help | help |
| Clears ClassMATE Data | clear |
| Exit ClassMATE | exit |
Contact Us
For any assistance or difficulties, feel free to drop us an email at classMateys@gmail.com !
Glossary
| Term | Definition |
|---|---|
| Java 11 | Java is a programming language, more on it here. |
| JSON | a JSON file is an open standard file format, more on it here. |
| CLI | Command Line Interface (CLI) enables users to interact with a program by typing in text commands following visual prompts from the program. |
| GUI | Graphical User Interface (GUI) is a system of interactive visual components that allows users to interact with a program through graphical icons. |