Developer Guide
- Acknowledgements
- Setting up, getting started
- Design
- Implementation
- Documentation, logging, testing, configuration, dev-ops
- Appendix: Requirements
- Appendix: Instructions for manual testing
Acknowledgements
- This project is based on the AddressBook-Level3 project created by the SE-EDU initiative.
Setting up, getting started
Refer to the guide Setting up and getting started.
Design
.puml files used to create diagrams in this document can be found in the diagrams folder. Refer to the PlantUML Tutorial at se-edu/guides to learn how to create and edit diagrams.
Architecture
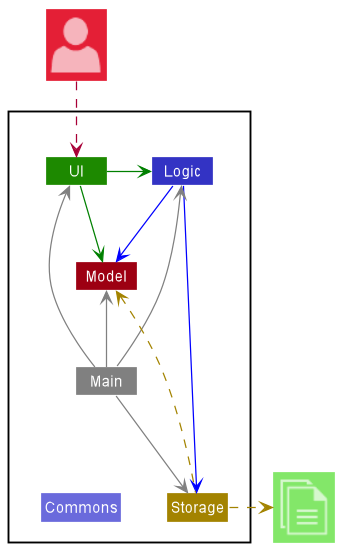
The Architecture Diagram given above explains the high-level design of the App.
Given below is a quick overview of main components and how they interact with each other.
Main components of the architecture
Main has two classes called Main and MainApp. It is responsible for,
- At app launch: Initializes the components in the correct sequence, and connects them up with each other.
- At shut down: Shuts down the components and invokes cleanup methods where necessary.
Commons represents a collection of classes used by multiple other components.
The rest of the App consists of four components.
-
UI: The UI of the App. -
Logic: The command executor. -
Model: Holds the data of the App in memory. -
Storage: Reads data from, and writes data to, the hard disk.
How the architecture components interact with each other
The Sequence Diagram below shows how the components interact with each other for the scenario where the user issues the command deletestu 1.
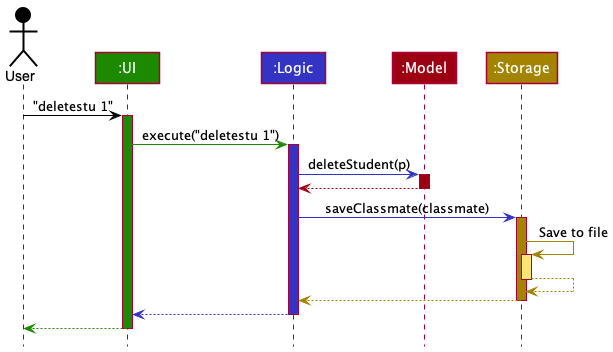
Each of the four main components (also shown in the diagram above),
- defines its API in an
interfacewith the same name as the Component. - implements its functionality using a concrete
{Component Name}Managerclass (which follows the corresponding APIinterfacementioned in the previous point).
For example, the Logic component defines its API in the Logic.java interface and implements its functionality using the LogicManager.java class which follows the Logic interface. Other components interact with a given component through its interface rather than the concrete class (reason: to prevent outside component’s being coupled to the implementation of a component), as illustrated in the (partial) class diagram below.

The sections below give more details of each component.
UI component
The API of this component is specified in Ui.java
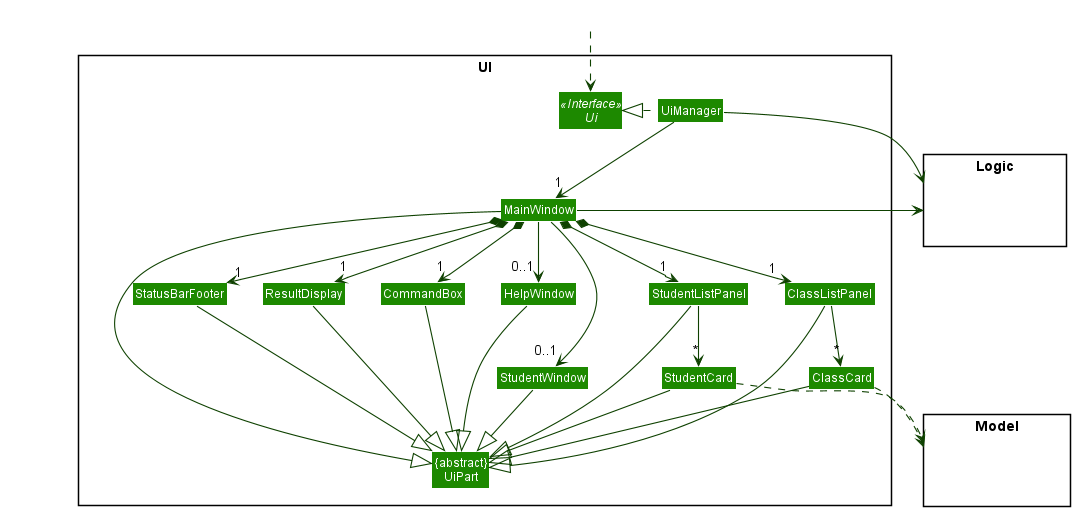
The UI consists of a MainWindow that is made up of parts e.g.CommandBox, ResultDisplay, StudentListPanel, ClassListPanel, StatusBarFooter etc. All these, including the MainWindow, inherit from the abstract UiPart class which captures the commonalities between classes that represent parts of the visible GUI.
The UI component uses the JavaFx UI framework. The layout of these UI parts are defined in matching .fxml files that are in the src/main/resources/view folder. For example, the layout of the MainWindow is specified in MainWindow.fxml
The UI component,
- executes user commands using the
Logiccomponent. - listens for changes to
Modeldata so that the UI can be updated with the modified data. - keeps a reference to the
Logiccomponent, because theUIrelies on theLogicto execute commands. - depends on some classes in the
Modelcomponent, as it displaysStudentandTutorialClassobjects residing in theModel.
Logic component
API : Logic.java
Here’s a (partial) class diagram of the Logic component:
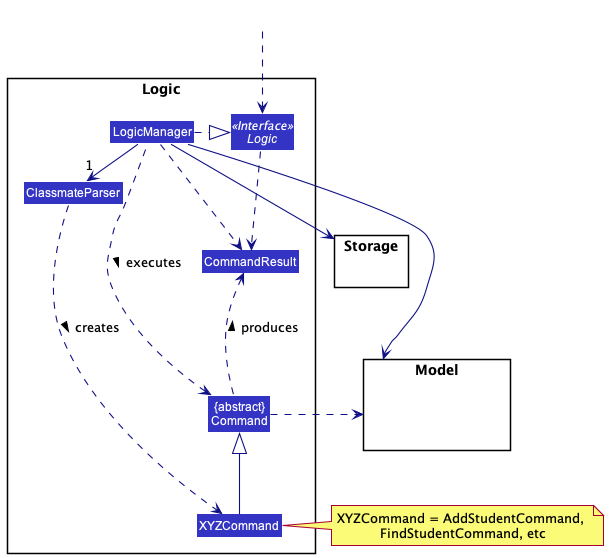
How the Logic component works:
- When
Logicis called upon to execute a command, it uses theClassmateParserclass to parse the user command. - This results in a
Commandobject (more precisely, an object of one of its subclasses e.g.,AddCommand) which is executed by theLogicManager. - The command can communicate with the
Modelwhen it is executed (e.g. to add a student). - The result of the command execution is encapsulated as a
CommandResultobject which is returned fromLogic.
The Sequence Diagram below illustrates the interactions within the Logic component for the execute("deletestu 1") API call.
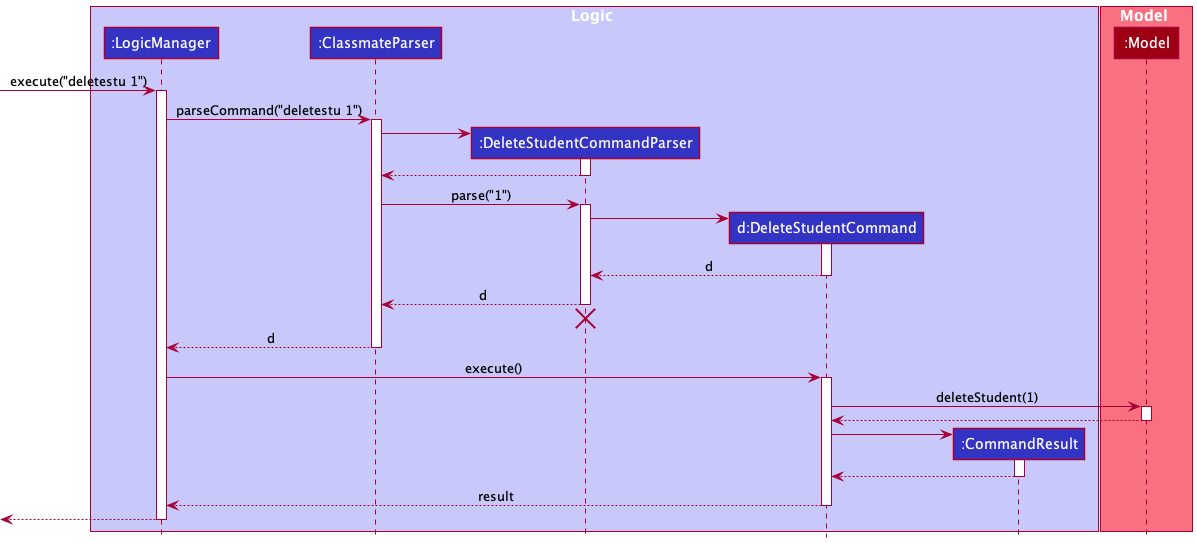
DeleteStudentCommandParser should end at the destroy marker (X) but due to a limitation of PlantUML, the lifeline reaches the end of diagram.
Here are the other classes in Logic (omitted from the class diagram above) that are used for parsing a user command:
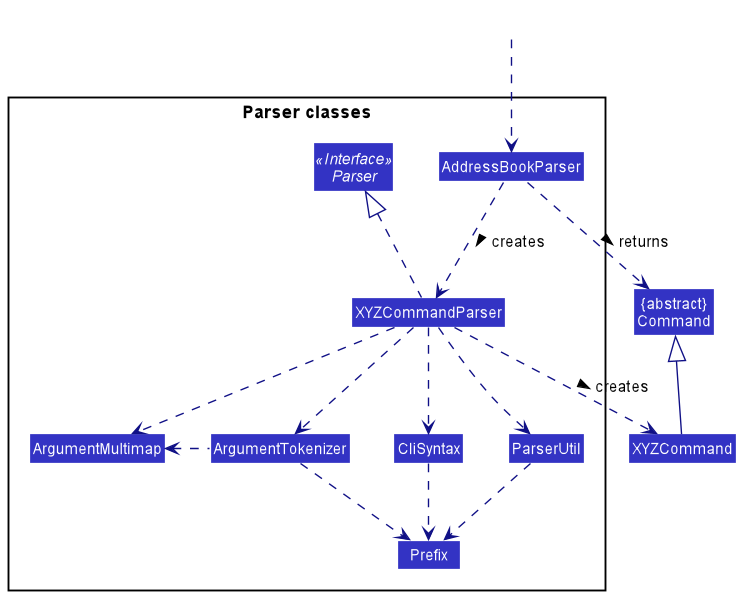
How the parsing works:
- When called upon to parse a user command, the
ClassmateParserclass creates anXYZCommandParser(XYZis a placeholder for the specific command name e.g.,AddStudentCommandParser) which uses the other classes shown above to parse the user command and create aXYZCommandobject (e.g.,AddStudentCommand) which theClassmateParserreturns back as aCommandobject. - All
XYZCommandParserclasses (e.g.,AddStudentCommandParser,DeleteStudentCommandParser, …) inherit from theParserinterface so that they can be treated similarly where possible e.g, during testing.
Model component
API : Model.java
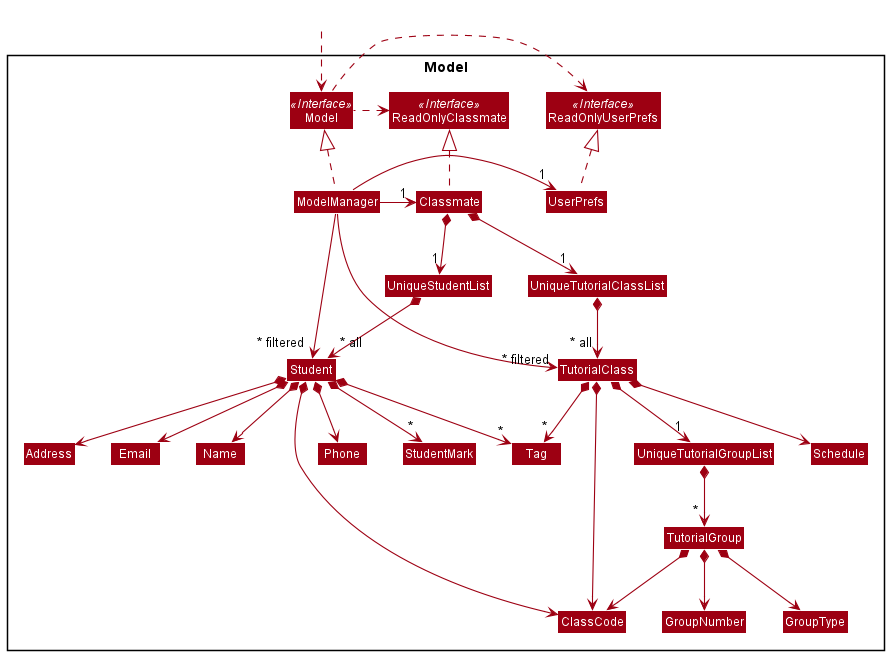
The Model component,
- stores the ClassMATE data i.e., all
Studentobjects (which are contained in aUniqueStudentListobject), and allTutorialClassobjects (which are contained in aUniqueTutorialClassListobject). - stores the currently ‘selected’
StudentandTutorialClassobjects (e.g., results of a search query) as a separate filtered lists which are exposed to outsiders as an unmodifiableObservableList<Student>andObservableList<TutorialClass>that can be ‘observed’ e.g. the UI can be bound to this list so that the UI automatically updates when the data in the list change. - stores a
UserPrefobject that represents the user’s preferences. This is exposed to the outside as aReadOnlyUserPrefobjects. - does not depend on any of the other three components (as the
Modelrepresents data entities of the domain, they should make sense on their own without depending on other components)
Tag list in the ClassMATE, which Student references. This allows ClassMATE to only require one Tag object per unique tag, instead of each Student needing their own Tag objects.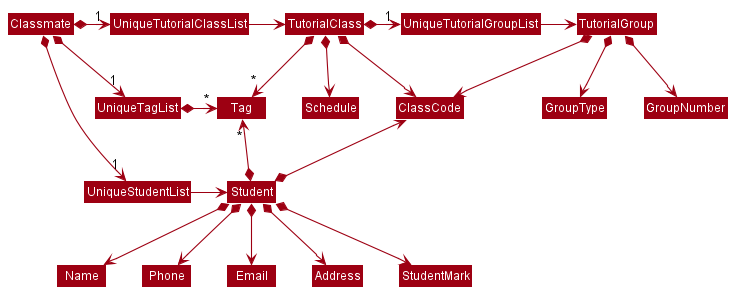
Storage component
API : Storage.java
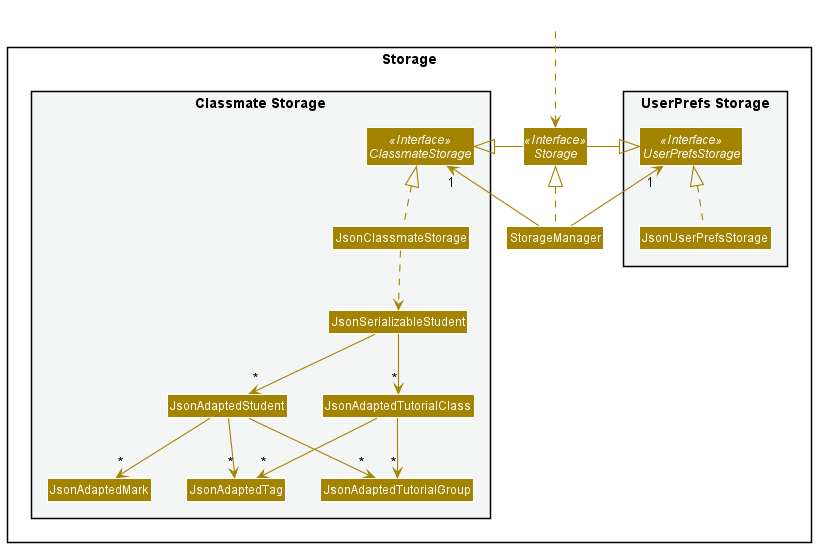
The Storage component,
- can save both ClassMATE data and user preference data in json format, and read them back into corresponding objects.
- inherits from both
ClassmateStorageandUserPrefStorage, which means it can be treated as either one (if only the functionality of only one is needed). - depends on some classes in the
Modelcomponent (because theStoragecomponent’s job is to save/retrieve objects that belong to theModel)
Common classes
Classes used by multiple components are in the seedu.address.commons package.
Implementation
This section describes some noteworthy details on how certain features are implemented.
Tutorial Class Management Features
(Contributed by Rushil Ramesh and Vishnu Sundaresan)
ClassMATE allows the user to manage information relevant to the TutorialClass. A User is able to:
- Add a new tutorial class
- Delete an existing tutorial class
- List all existing tutorial class
- Find tutorial classes by their class codes (more here)
- View Class Details
Current Implementation
The class Classmate facilitates all operations related to tutorial classes. It maintains a UniqueTutorialClassList
of containing all tutorial classes, as well as a FliteredList of TutorialClass instances reflecting the current
state of the tutorial class list to be displayed to the user. The Classmate contains a summary of all the logic of the
tutorial class commands (e.g. AddClassCommand) executed on the UniqueTutorialCLassList.
The following operations are implemented:
-
Classmate#hasTutorialClass(TutorialClass tutorialClass)- Checks if tutorial class is in ClassMATE -
Classmate#addTutorialClass(TutorialClass tutorialClass)- Adds tutorial Class to ClassMATE -
Classmate#removeTutorialClass(TutorialClass tutorialClass)- Deletes existing tutorial class from ClassMATE -
Classmate#getTutorialClassList()- Displays entire list of tutorial classes. -
Model#updateFilteredTutorialClassList(Predicate<TutorialClass> predicate)- Searches for tutorial class by keyword and displays filtered list. -
Model#updateUnfilteredStudentList(List<Student> students)- Updates list of students when a class is deleted.
These operations are exposed in the Model interface as Model#hasTutorialClass(TutorialClass tutorialClass),
Model#addTutorialClass(TutorialClass tutorialClass), Model#deleteTutorialClass(TutorialClass tutorialClass) and
Model#getTutorialClass()respectively.
Given below is an example of how the tutorial class features can be used:
Step 1. The user launches the application for the first time. The UniqueTutorialClassList would be derived from the
initial ClassMATE state, and all tutorial classes stored will be displayed.
Step 2. The user executes an addc c/G01 s/Tuesday 12:00pm to 2:00pm, Friday 12:00pm to 2:00pm command. The addc command calls Model#addTutorialClass(), adding a new tutorial class to ClassMATE. This modifies and saves the
state of ClassMATE. The updated UniqueTutorialClassList will be displayed in the ClassListPanel
to the user.
Step 3. The user executes a viewc 1 command. The viewc command updates the filteredTutorialClasses to only display the class at the
given index, and updates the filteredStudents to contain only the students who are in the selected class. The updated filtered list of
students and tutorial classes will be displayed to the user.
Step 4. The user executes a deletec 2 command. The deletec command calls Model#deleteTutorialCLass(), modifying and saving the
state of ClassMATE by deleting the class stored at the given index in the FilteredList. The students from the deleted class are no longer part of the deleted
class and left with a displayed class code of No Class. The tutorial groups that were part of the class will be deleted. This updated list will be displayed to the user.
Step 5. The user executes a listc command. The listc command calls Model#updateFilteredTutorialClassList() modifying and saving the state of the FilteredList
to contain all tutorial classes in ClassMATE. This updated list will be displayed to the user.
Using the example of the AddClassCommand,
when the user enters the addc command to add a tutorial class, the user input command undergoes the same command parsing as described in Logic component.
During the parsing, a new TutorialClass instance is created. This TutorialClass instance will be received by the AddClassCommand when it is created.
The command is then executed, adding the new class to ClassMATE
The Sequence Diagram below summarises the aforementioned steps in the execution of the command.
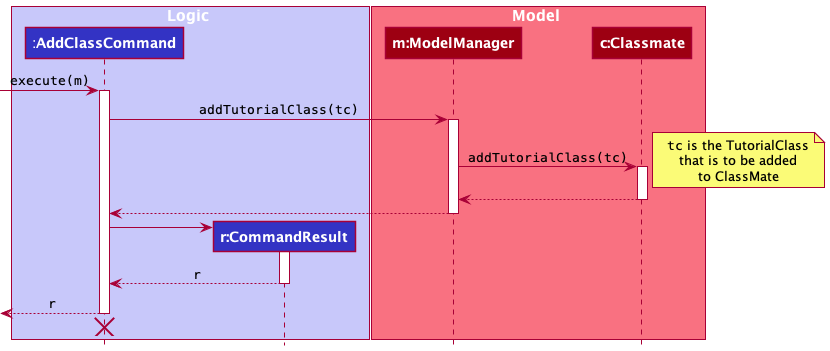
Execution of the AddClassCommand
Design Considerations
Aspect: Student and Tutorial Class lists
- Alternative 1 (current choice): Use two separate lists to store students and tutorial classes
- Pros: Faster, simpler command executions for student and tutorial class commands. Easier to maintain overall. Therefore, all students and all tutorial classes can be accessed independent of each other.
- Cons: Class specific student commands are slower. For example a user is required to
viewcin order to filter just the students in the class, increasing the overall time
- Alternative 2: Nesting of students within Tutorial Class
- Pros: Faster in class specific student commands and students are better organised.
- Cons: Complexity of tutorial classes is increased and slower to navigate to view other tutorial classes or perform general commands on the students
Student Management Features
(Contributed by Rushil Ramesh)
ClassMATE allows the user to manage information about Students. The user is able to:
- Add a student
- Edit an existing student
- View a student’s details
- Delete a student
- List all students
- Find students by name
Current Implementation
Classmate facilitates all operations related to students. It maintains a UniqueStudentList consisting of all students as well as a
separate FilteredList of students in ModelManager that reflect the current state of the student list to be displayed to the user. Classmate contains the logic related to
managing students, and summarises the various student related commands.
The following operations are supported by ClassMATE:
-
Classmate#hasStudent(Student student)- Checks if a student is in ClassMATE -
Classmate#addStudent(Student student)- Adds a student to ClassMATE -
Classmate#setStudent(Student student, Student editedStudent)- Edits a student’s details -
Classmate#removeStudent(Student student)- Deletes existing student from ClassMATE -
Model#updateFilteredStudentList(Predicate<Student> predicate)- Searches for a student by given keyword and displays filtered list.
These operations are exposed in the Model interface, which call methods of Classmate and FilteredList.
Given below is an example of how the student features could be used by the user:
Step 1. The user launches the application for the first time. The UniqueStudentList would be derived from the initial ClassMATE state, and
all students stored will be displayed with their details.
Step 2. The user creates a tutorial class by using the addc command, for example addc c/G01 s/Tuesday 12:00pm to 2:00pm, Friday 12:00pm to 2:00pm.
The newly created tutorial class will be displayed in the ClassListPanel to the user. Refer to Tutorial Class Management Features
section for more information on tutorial classes.
Step 3. The user executes a addstu n/Johnny Tay p/98989898 a/26 Clementi Avenue 6 e/johnnytay@email.com c/G01 command. The addstu command executes the
AddStudentCommand, which in turn calls the Model#addStudent() command to add a new student to ClassMATE. The student is added to the recently create G01 class.
The updated UniqueStudentList will be displayed to users on the StudentListPanel.
Step 4. The user executes a findstu Johnny command. The findstu command calls the Model#updateFilteredStudentList() method which
modifies the state of the FilteredList of students. The updated filtered list containing the students whose names match the query keywords will
be displayed to the user. Users will have to type one of the student’s names to find a particular student (e.g. findstu Tay will also filter our newly added student)
Step 5. The user executes a viewstu 1 command. The viewstu command causes a pop-up window to appear, displaying the details of the selected student, such as the
groups the student is in and the class participation marks for previous lessons. Any movements to the main screen would result in this window closing.
Step 6. The user executes a deletestu 2 command. The deletestu command calls the Model#deleteStudent() function. This executes a DeleteStudentCommand,
which deletes a student currently in the second index of the FitleredList. This modifies and saves the state of ClassMATE, displaying the updated list of students
to the user.
Step 7. the user executes a liststu command. The command calls the Model#updateFilteredStudentList() function by setting the predicate of the
FilteredList to true for all students. The updated list consisting of all students in ClassMATE is then displayed to the user.
The logic flow of executing a student command can be best illustrated using the FindStudentCommand. When the enters the findstu
command to find a Student whose name matches the given keyword, the user input undergoes the same command parsing
as described in the Logic component section. During the parsing, a new NameCOntainsKeywordsPredicate is created,
which will be received by the FindStudentCommand. The execution of a command sets thePredicate of the FilteredList of students
to the parsed predicate, updating the list that is displayed.
The Sequence Diagram below summarises the aforementioned steps in the execution of the command.
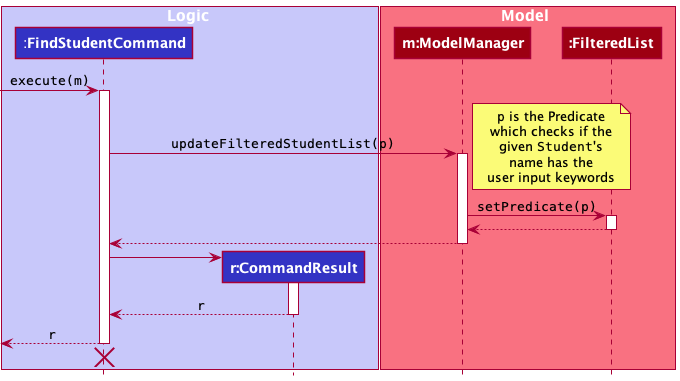
Execution of the FindStudentCommand
Design Considerations
Aspect: Adding Students to ClassMATE
- Alternative 1 (current choice): Add a student with a compulsory
CLASS_CODEparameter- Pros: This was the most intuitive option, as users only need add students assigned to their classes. Therefore, requiring users to create a class before adding a student prevents the case where students are added without a class
- Cons: This increases the command length for the user, increasing the time taken for the user to type the command.
- Alternative 2: Add a student independent of whether the tutorial class has been created
- Pros: Users are able to create a student without having to take the additional step of creating a class, and shorter command length means higher typing speeds for users.
- Cons: This would require an additional command to add students to a class, which decreases the efficiency of the program.
Aspect: Display of Student Information
- Alternative 1 (current choice): Display a summary of user information in the List and more details upon viewing the student.
- Pros: This reduces cluttering in the student display panel and presents the necessary information to the user in the list. User has the option to focus on a particular student and view additional details if they need to.
- Cons: This necessitates the creation of an additional
viewccommand for users to be able to view this data.
- Alternative 2: Present all student information in the student list itself.
- Pros: All student information can be seen in one place without having to use additional commands to access information.
- Cons: This is not visually appealing and provides information in a cluttered manner to the user, reducing the overall quality of the user’s experience using the application.
Student Participation Mark Features
(Contributed by Vishnu Sundaresan)
ClassMATE allows the user to manage information about Class Participation grading relevant to each Student. A User is able to:
- Add a weekly participation mark
- Delete a weekly participation mark
- Delete all weekly participation marks
Proposed Implementation
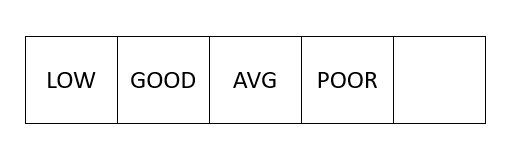
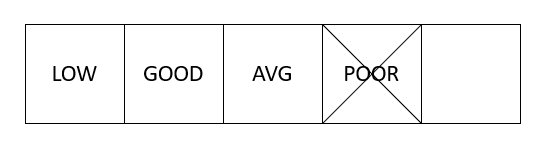
Each Student will contain a List known as marks that will store all participation mark values for the Student. This list is internally stored as an ArrayList. Using an Enumeration of Student Marks, which contains the following Marks:
-
POOR(0 marks) -
LOW(1 mark) -
AVG(2 marks) -
GOOD(3 marks) -
HIGH(4 marks) -
EXCELLENT(5 marks)
ClassMATE will then support the following command classes:
AddLastMarkCommand(Index index, StudentMark mark)DeleteLastMarkCommand(Index index)DeleteAllMarksCommand(Index index)
These commands inherit from the Command class, and are named accordingly.
Given below is an example of how the student marks features can be used:
Step 1. The user launches the application for the first time. The existing marks list would be derived from the
initial ClassMATE state, and all students stored will be displayed along with their currently stored marks below their name
Step 2. The user executes an addm 1 m/low command. After the Command has been parsed, the addm command calls AddLastMarkCommand#addStudentMark() and subsequently Model#setStudent() and Model#updateFilteredStudentList(), adding the mark provided (LOW in this case) to Classmate. This modifies and saves the state of ClassMATE. The updated UniqueStudentList will be displayed in the ClassListPanel to the user.
Step 3. The user executes a deletelm 1 command. The deletelm command calls the DeleteLastMarkCommand#deleteLastStudentMark() and subsequently theModel#setStudent() and the Model#updateFilteredStudentList(), modifying the state of the filtered list of students. The updated filtered list consists the students with the latest mark removed from the 1st student.
Before deletelm command
After deletelm command
Step 4. The user executes a deleteam 1 command. The deleteam command calls DeleteAllMarkCommand#deleteAllStudentMark(), then subsequently Model#setStudent()and Model#updateFilteredStudentList(), modifying and saving the state of ClassMATE by deleting all marks for the 1st student at the given index in the UniqueStudentList. This updated list will be displayed to the user.
Using the example of the AddMarkCommand,
when the user enters the addm command to add a tutorial class, the user input command undergoes the same command parsing as described in “Logic component”.
During the parsing, a new Student instance is created. This Student instance will be received by the AddMarkCommand when it is created.
The Sequence Diagram below summarizes the aforementioned steps.
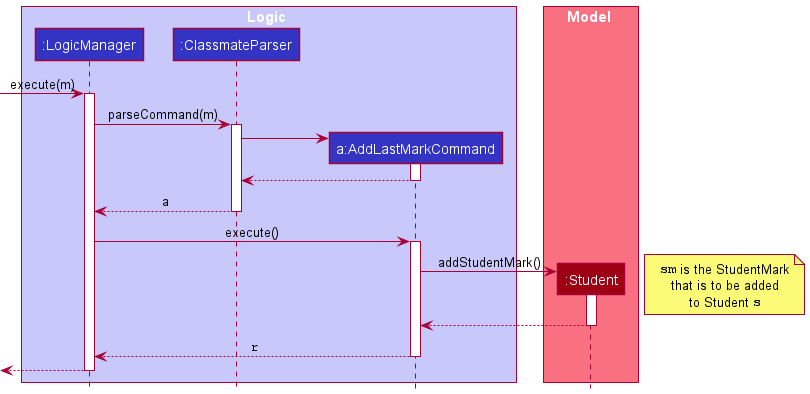
Execution of the AddMarkCommand
Design Considerations
Aspect: Rationale for studentMarks size
- Alternative 1 (current choice): Keep a list of variable length
- Pros: Flexible, allows instructors not to worry about the number of tutorials taken.
- Cons: Prone to human error of counting, not tallying within strict 26 tutorial-limit.
- Alternative 2: Keep a fixed-size list of 26
- Pros: Since there are 13 weeks and two tutorials a week, there will be a projected 26 tutorials held. Thus, a fixed size of 26 elements will allow the list to reflect this requirement.
- Cons: Instructors are limited to this 26-class limit, and cannot store marks for extra tutorials/make-up sessions.
Aspect: Display of Marks
- Alternative 1: Display as a list under student credentials in each student card
- Pros: Simple to implement, easily viewed
- Cons: Unable to fit all marks, lack of earlier mark visibility
- Alternative 2 (current choice): Display in
viewstucommand as separate feature- Pros: Can view all marks at once, clear to understand
- Cons: Marks can only be viewed for one student at a time
ClassCode Features
(Contributed by Zhou Yirui)
ClassMATE allows user to assign a Student or a Tutorial Group to a Tutorial Class using a ClassCode. A user is able to:
- Add ClassCode to a student
- Edit ClassCode of a student
- Create Tutorial Group using ClassCode
- Create Tutorial Classes using ClassCode
Current Implementation
The class ClassCode facilitates all operations related to classCode. ClassCode is implemented such that a
Tutorial Class with the corresponding ClassCode must exist before the ClassCode can be added. Tutorial Class G00 is a
default class that do not need to be created and is an empty ClassCode. It is assigned to a Student whose Tutorial Class has been deleted.
Given below is an example of how ClassCode can be used.
Step 1: After launching the application for the first time, user executes addstu n/Abigail p/91199119 e/ab@gmail.com a/Downling Park #15-20 c/G08.
The addstu command calls Model#hasTutorialClass(), and the model component checks if the TutorialClass specified by the
class code exists. If it exists, the student is added successfully with the classCode parameter G08, else, an error message is given.
Step 2: The user deletes TutorialClass G08 using the deletec c/G08 command. The deletec command changes the ClassCode of all students
of TutorialClass G08 to G00. On ClassMATE, the UI reflects the Student to have no Tutorial Class, i.e. No class.
Tutorial Group Management Features
This feature is split into two parts.
- Adding/removing tutorial group to tutorial class (Contributed by Ngu Yi Yang)
- Adding/removing student to tutorial group. (Contributed by Zhou Yirui)
ClassMATE allows the user to manage information relevant to the TutorialGroup. A User is able to:
- Add a new tutorial group to an existing tutorial class
- Remove an existing tutorial group from an existing tutorial class
- Add a student to an existing tutorial group
- Remove a student from tutorial group
Current Implementation (Adding/removing tutorial group to tutorial class)
The class Classmate facilitates all operations related to tutorial groups. It maintains a
UniqueTutorialClassList containing all tutorial classes, where each TutorialClass maintains a UniqueTutorialGroupList containing its tutorial groups.
Classmate contains a summary of all the logic of the interaction between tutorial group and tutorial class such as
adding tutorial groups to tutorial classes (e.g. AddGroupCommand) executed on the UniqueTutorialGroupList.
The following operations are implemented which highlight the interactions between subcomponents within Model
related to adding a tutorial group to a class:
-
UniqueTutorialClassList#contains(TutorialClass toCheck)- Checks if tutorial class exists -
UniqueTutorialClassList#contains(TutorialGroup toCheck)- Checks if tutorial group is in any of the tutorial classes -
TutorialClass#isSameTutorialClass(TutorialClass tutorialClass)- Checks if two tutorial classes are the same. They are the same if their Class codes are the same. -
TutorialGroup#isSameTutorialGroup(TutorialClass tutorialGroup)- Checks if two tutorial groups are the same. They are the same if their Class codes, Group number and Group type are the same. -
UniqueTutorialClassList#add(TutorialGroup toAdd)- Finds the tutorial group list of the tutorial class to add the tutorial group to -
UniqueTutorialGroupList#add(TutorialGroup toAdd)- Adds tutorial group to the tutorial group list of a class -
TutorialClass#getTutorialGroups()- Retrieves the list of tutorial groups within the TutorialClass -
TutorialClass#createTestTutorialClass(ClassCode classCode)- Creates a dummy tutorial class with the class code of the tutorial group for checking
Given below is an example of how the tutorial group features can be used:
Step 1. The user executes an addcg gn/1 c/G06 type/OP1 command. The addcg command calls Model#hasTutorialClass(),
and the model component checks if the tutorial class specified by the class code exists and throws an exception if it does not.
It then checks whether the tutorial group already exists using Model#hasTutorialGroup()and calls Model#addTutorialGroup() if it does not.
The checking of whether the tutorial class and tutorial group already exists is implemented as such:
Classmate calls the contains method of its UniqueTutorialClassList. This method is overloaded to accept
either a TutorialClass or TutorialGroup. The difference between the implementation of these two is that for the former,
it checks through its list of tutorial classes by utilising streams and the TutorialClass#isSameTutorialClass() method.
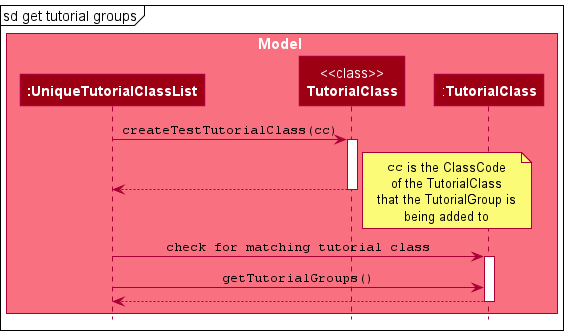
For the latter, it uses TutorialClass#createTestTutorialClass(ClassCode classCode)
to create the tutorial class representing the one that the tutorial group is being added to so that it can then retrieve that tutorial class
within the UniqueTutorialClassList. Since the checking of whether the tutorial class exists is done beforehand,
the tutorial class is guaranteed to exist and is retrieved. From the tutorial class, its UniqueTutorialGroupList is retrieved using the method TutorialClass#getTutorialGroups().
It then checks whether tutorial group already exists by utilising streams and the TutorialGroup#isSameTutorialGroup() method.
Adding of tutorial groups is similar; UniqueTutorialClassList#add(TutorialGroup toAdd) retrieves the tutorial class from the UniqueTutorialClassList and its UniqueTutorialGroupList,
in order to add the tutorial group using UniqueTutorialGroupList#add(TutorialGroup toAdd).
This modifies and saves the state of ClassMATE.
Step 2. The user executes a deletecg c/G06 gn/1 type/OP1 command. The deletecg command works in the same way as the addcg
command, except it removes that tutorial group from ClassMATE after checking if it exists. It also removes all students
in that tutorial group.
Using the example of the AddGroupCommand,
when the user enters the addcg command to add a tutorial group, the user input command undergoes the same command parsing as described in “Logic component”.
During the parsing, a new TutorialGroup instance is created. This TutorialGroup instance will be received by the AddGroupCommand when it is created.
The Sequence Diagram below summarizes how tutorial groups are added to a tutorial class.
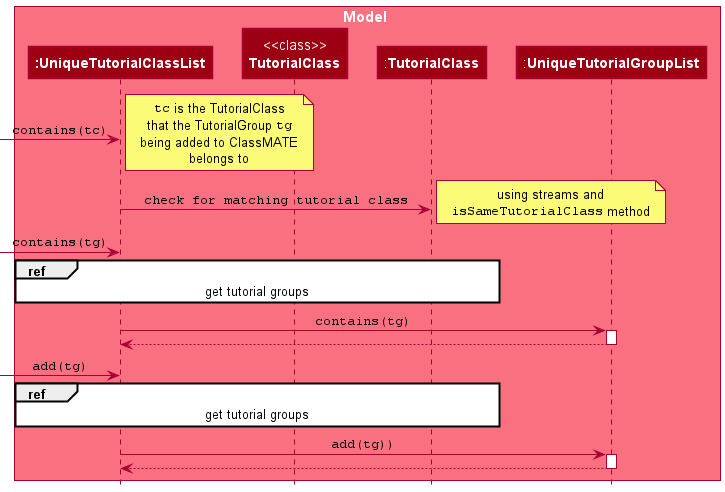
The Sequence Diagram below shows how UniqueTutorialClassList retrieves the
UniqueTutorialGroupList from the specified TutorialClass for checking or adding of a given tutorial group.
Design Considerations
Aspect: Storing Tutorial Groups as lists
- Alternative 1 (current choice): Storing tutorial groups in their respective tutorial classes
- Pros: Faster when performing find functions such as finding tutorial groups in a particular class. Tutorials groups are also better organised.
- Cons: Splitting groups based on a category makes it harder to extend to support filtering groups with a different category from what is implemented.
- Alternative 2: Use a single list to store all tutorial groups.
- Pros: Simpler to implement, easier to add or remove tutorial groups. Storing tutorial groups as arrays in JSON is less complicated.
- Cons: Searching or filtering the list of tutorial groups by group types may take a longer time.
Current Implementation (Adding/Removing Student from Tutorial Group)
Each Student contains a Set of TutorialGroup they belong to. Tutorial Groups are stored internally as a HashSet. The HashSet of
TutorialGroup is implemented such that there are no duplicate TutorialGroup, and each Student belongs to at most 1 TutorialGroup of
each Group Type.
ClassMATE will then support the following command classes:
AddStudentToGroupCommand(Index index, TutorialGroup tutorialGroup)DeleteStudentFromGroupCommand(Index index, TutorialGroup tutorialGroup)
Given below is an example of how the Add and Delete Student from Tutorial Groups features can be used:
Step 1. The user launches the application for the first time. The existing set of TutorialGroup for each Student would be retrieved from the initial
ClassMATE state, and would be displayed with the details the Student.
Step 2. The user enters liststu to list all the existing Students in ClassMATE
Step 3. The user executes addsg 1 gn/1 c/G06 type/OP1. After the Command has been parsed, the addsg command calls AddStudentToGroup#addTutorialGroup().
Subsequently, Model#setStudent and Classmate#setStudent are called consecutively to update the TutorialGroup of the Student.
During the execution of AddStudentToGroupCommand, a new Student instance with the edited set of TutorialGroup is created.
Design Considerations
Aspect: Student parameters in the Command
- Alternative 1 (current choice): Identifying the Student using Index.
- Pros: Easier to implement. Less ambiguity arising from Students with the same names.
- Cons: Adding/Deleting a Student from a Tutorial Group takes a longer time. Filtering the Student list may be necessary.
- Alternative 2: Identifying the Student using a Student ID.
- Pros: Faster to perform the action of adding/deleting a Student from Tutorial Group.
- Cons: Utility of Student ID is low as it is not used by other Commands. Also more difficult to implement.
Class and Tutorial Group Filters Features
(Contributed by Gabriel Waikin Loh Matienzo)
ClassMATE allows the user to filter students based on tutorial groups and find. A user is able to:
- View all students in a class
- View all students in a group
Proposed Implementation
Using the Predicate class ClassCodeContainsKeywordsPredicate(implemented by Vishnu), which finds a specific class given a class code as well as implementing a GroupMember Predicate that filters for students in a particular tutorial group, Model#updateFilteredStudentList is used to display a new list of students from a particular class or tutorial group.
ClassMATE will then support the following command classes:
FindClassCommand(ClassCode classCode)ViewGroupCommand(ClassCode classCode, GroupNumber groupNumber, GroupType groupType)
These commands inherit from the Command class, and are named accordingly.
Given below is an example of how the class and group filter features can be used:
Step 1. The user has at least one class and at least one group in that class. The user executes a findc G01 command. During parsing the findc command creates a ClassCodeContainsKeywordsPredicate that is used to call Model#updateFilteredClassList() to filter for TutorialClass(s) with the same class code(s) as the one(s) specified. Before this, the findc command also checks if there is no such TutorialClass and returns an error if there is none. If there are no errors, the state of the filtered list of tutorial classes is updated, and the updated filtered list will display the results of the search query to the user.
Step 2. The user executes a viewg c/G01 type/OP1 gn/1 command. After parsing the command, the viewg command first checks if there exists a TutorialClass with the specified class code. the viewg command checks if there exists a TutorialGroup with the specified class code, group type and group number. After all the checks pass, the viewg command calls Model#updateFilteredStudentList() to filter for students who belong to the TutorialGroup with the specified parameters. This updates the state of the filtered list of students, and the updated filtered list will display the results of the search query to the user.
Design Considerations
Aspect: Finding Tutorial Classes
- Alternative 1 : Find tutorial classes by filtering for all tutorial classes with class codes containing the given keyword.
- Pros: Shorter keywords may increase user typing speed slightly, and user is able to find multiple classes at once.
- Cons: The increase in user typing speed may be marginal and negligible, as users may only save time not typing 1 character as the class codes are 3 characters long and all class codes begin with G. Additionally, the search will have lower accuracy as you may see up to 10 classes for a two character search e.g.
G0.
- Alternative 2 (current choice): Find tutorial classes by their exact class code
- Pros: Higher Accuracy in search, and since class codes are only three characters long, it does not cause users to take significantly more time.
- Cons: Keywords used in searches can only match specific classes instead of finding multiple classes at once.
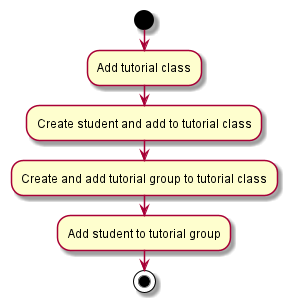
Recommended workflow for setting up ClassMATE
The Activity Diagram below provides an example of how users should set up their tutorial classes, tutorial groups and students in ClassMATE.
Documentation, logging, testing, configuration, dev-ops
Appendix: Requirements
Product scope
Target user profile:
- CS2101 Tutors with multiple tutorial classes
- prefer desktop apps over other types
- can type fast
- prefers typing to mouse interactions
- is reasonably comfortable using CLI apps
Value proposition: Manage and store student details faster than a typical mouse/GUI driven app. Organise students within classes and groups.
User stories
Priorities: High (must have) - * * *, Medium (nice to have) - * *, Low (unlikely to have) - *
| Priority | As a … | I want to … | So that I can… |
|---|---|---|---|
* * * |
new user | find help | refer to instructions when I forget how to use the App |
* * |
new user | view sample data | see what the app looks like when in use |
* * * |
user | add a new student | |
* * * |
user | view a student’s details | easily check the details and progress of the students |
* * * |
user | add a new class | |
* * |
user | add a class schedule | plan my week in advance |
* * * |
user | view a class’ details | easily check the details of a particular class |
* * * |
user | delete a student | remove students as required |
* * * |
user | delete a class | remove classes I no longer need |
* * * |
user | find a student by name | locate details of students without having to go through the entire list |
* * * |
user | find a class by code | locate details of a class without having to go through the entire list |
* * * |
user | view all classes | see which classes I’m taking |
* * * |
user | view all students in a class | see the students enrolled in a particular class |
* * |
experienced user | add class participation details to a student | track the participation of each student |
* |
user | add different types of marks to students | to mark students for various assessments |
* * |
experienced user | add tutorial groups within tutorial classes | organise my class groups |
* * |
experienced user | add students to specific tutorial groups | to organise students in groups based on examination (e.g. OP1) |
* * |
experienced user | delete students from specific tutorial groups | remove students from tutorial groups as required |
* * |
experienced user | view students from specific tutorial groups | easily see the students in a tutorial group |
* * |
experienced user | delete tutorial groups from tutorial classes | remove tutorial groups I no longer need |
Use cases
(For all use cases below, the System is the ClassMATE and the Actor is the user, unless specified otherwise)
Use case: Delete a student
MSS
-
User requests to list students
-
ClassMATE shows a list of students
-
User requests to delete a specific student in the list
-
ClassMATE deletes the student
Use case ends.
Extensions
-
2a. The list is empty.
Use case ends.
-
3a. The given index is invalid.
-
3a1. ClassMATE shows an error message.
Use case resumes at step 2.
-
Use case: Edit a student
MSS
-
User requests to list students
-
ClassMATE shows a list of students
-
User requests to edit a specific student in the list with some parameters
-
ClassMATE edits the student
Use case ends.
Extensions
-
2a. The list is empty.
Use case ends.
-
3a. The given index is invalid.
-
3a1. ClassMATE shows an error message.
Use case resumes at step 2.
-
-
3b. The given parameter to edit is a Class Code.
-
3b1. ClassMATE removes all existing tutorial groups of the student.
Use case resumes at step 4.
-
Use case: List students
MSS
-
User requests to list students
-
ClassMATE shows a list of students
Use case ends.
Extensions
-
1a. User decides to specify a class to list students
-
1a1. ClassMATE shows a list of students in the specified tutorial class
Use case ends.
-
-
2a. The list is empty.
Use case ends.
Use case: Add a tutorial class
MSS
-
User requests to add a tutorial class.
-
ClassMATE adds the tutorial class.
Use case ends.
Extensions
-
1a. The tutorial class already exists.
- 1a1. ClassMATE shows a message informing the user.
Use case ends.
Use case: Find and view a tutorial class
MSS
-
User requests to find a tutorial class
-
ClassMATE shows a list of classes with the given keyword
-
User requests to view a specific class in the list
-
ClassMATE shows the class details
Use case ends.
Extensions
-
2a. The list is empty.
Use case ends.
-
3a. The given index is invalid.
-
3a1. ClassMATE shows an error message.
Use case resumes at step 2.
-
Use case: Add a tutorial group
MSS
-
User requests to add a tutorial group with the given parameters, Group number, Group type and Class code.
-
ClassMATE adds the tutorial class.
Use case ends.
Extensions
-
1a. ClassMATE detects an invalid parameter.
- 1a1. ClassMATE shows a message informing the user.
Use case ends.
-
1b. The tutorial class that the tutorial group is being added to does not exist.
- 1b1. ClassMATE shows a message informing the user.
Use case ends.
-
1c. The tutorial group already exists.
- 1c1. ClassMATE shows a message informing the user.
Use case ends.
Use case: Add a Student to a Tutorial Group
MSS
-
User lists all the students with
liststu -
ClassMATE shows a list of students
-
User requests to add a Student to a Tutorial Group using the parameters INDEX of the Student, Group Number, ClassCode, and Group Type
-
ClassMATE adds the Student to the Tutorial Group
Extensions
-
2a. The list is empty.
Use case ends.
-
3a. The given Index is invalid.
- 3a1. ClassMATE shows an error message.
Use case resumes at step 2.
-
3b. Tutorial Group does not exist.
- 3b1. ClassMATE shows an error message.
Use case ends.
-
3c. A parameter is invalid.
- 3c1. ClassMATE shows an error message.
Use case resumes at step 2.
-
3d. Student already belongs to a group of Group Type (i.e. OP1 or OP2).
- 3d1. ClassMATE shows an error message.
Use case resumes at step 2.
Use case: View Students in a Tutorial Group
MSS
-
User requests to view Students in a Tutorial Group from a Tutorial Class using some parameters that identify the Tutorial Group.
-
ClassMATE shows the filtered list of students that belong to the specified Tutorial Group to the user.
Extensions
-
1a. Tutorial Class does not exist.
- 1a1. ClassMATE shows an error message.
Use case ends.
-
1b. Tutorial Group does not exist.
- 2b1. ClassMATE shows an error message.
Use case ends.
Use case: Delete the Latest Mark from Student
MSS
-
User lists all students with
liststu -
ClassMATE shows a list of students
-
User enters command
deletelm xwhere ‘x’ is the index of student to delete marks of -
ClassMATE deletes the latest mark stored for that student
Use case ends.
Extensions
-
2a. The list is empty.
Use case ends.
-
3a. The given index is invalid.
- 3a1. ClassMATE shows an error message.
Use case resumes at step 2.
-
3b. There are no marks stored for the student.
- 3b1. ClassMATE shows an error message.
Use case ends.
Non-Functional Requirements
- Should work on any mainstream OS as long as it has Java
11or above installed. - Should be able to hold at least 1000 students, 400 groups and 99 classes without a noticeable sluggishness in performance for typical usage.
- A user with above average typing speed for regular English text (i.e. not code, not system admin commands) should be able to accomplish most of the tasks faster using commands than using the mouse.
- Readable font, at least size 12.
- Should not cause noticeable lag for other applications when running.
- Dark Mode.
- Able to function in the background.
- Able to respond to user actions within three seconds.
- A tutorial class should be able to hold up to 20 students.
- A group should be able to hold up to 5 students.
- Each action should not take more than 3 commands.
Glossary
- Mainstream OS: Windows, Linux, Unix, (MAC) OS-X
- Private student detail: A student detail that is not meant to be shared with others
- Tutorial class: A CS2101 tutorial class. Each student can only have up to one tutorial class
- Student: An NUS student taking the CS2101(T) module
- Tutorial group: A tutorial group is a subsection of the class and contains a few students for the purpose of small activities or group project.
- Group number: The number of a group in the CS2101 class, which is specified by a number.
- Class code: The name of a typical class in for the CS2101 module. E.g. G06.
- Group type: The type of tutorial group in the CS2101 class, which is either OP1 or OP2.
Appendix: Instructions for manual testing
Given below are instructions to test the app manually.
Launch and shutdown
-
Initial launch
-
Download the jar file and copy into an empty folder
-
Double-click the jar file Expected: Shows the GUI with a set of sample contacts. The window size may not be optimum.
-
-
Saving window preferences
-
Resize the window to an optimum size. Move the window to a different location. Close the window.
-
Re-launch the app by double-clicking the jar file.
Expected: The most recent window size and location is retained.
-
Deleting a student
-
Deleting a student while all students are being shown
-
Prerequisites: List all students using the
liststucommand. Multiple students in the list. -
Test case:
deletestu 1
Expected: First student is deleted from the list. Details of the deleted student shown in the status message. Timestamp in the status bar is updated. -
Test case:
deletestu 0
Expected: No student is deleted. Error details shown in the status message. Status bar remains the same. -
Other incorrect delete commands to try:
delete,delete x,...(where x is larger than the list size)
Expected: Similar to previous.
-
-
Deleting a student that at a negative index.
- Prerequisites: List all students using the
liststucommand. Multiple students in the list. - Test case:
deletestu -5
Expected: No student is deleted. Error details shown in the status message. Status bar remains the same. - Other incorrect delete commands to try:
delete,delete x,...(where x is larger than the list size)
Expected: Similar to previous.
- Prerequisites: List all students using the
Saving data
-
Dealing with missing/corrupted data files
-
Prerequisites: None
-
Test case: JSON file missing.
Expected: ClassMATE gives warning about missing storage, and creates a new storage file populated with sample data.
-
Test case: JSON file corrupted
Expected: ClassMATE gives warning about corrupted data, and creates a new storage file populated with sample data.
-